
Webサイトやブログなどで、長い記事を見易く移動できるナビゲーションとして、「目次」を導入する方法があります。
通常であれば、自分でh3やh4タグにidを付けてリンクを貼るという作業が必要になりますが、WordPressには、それらの作業を全部自動でやってくれるという超便利なプラグイン「Table of Contents Plus(TOC+)」があります。
目次
TOC+のインストール
- プラグイン > 新規追加
- Table of Contents Plus を検索してインストール、有効化。
TOC+の設定
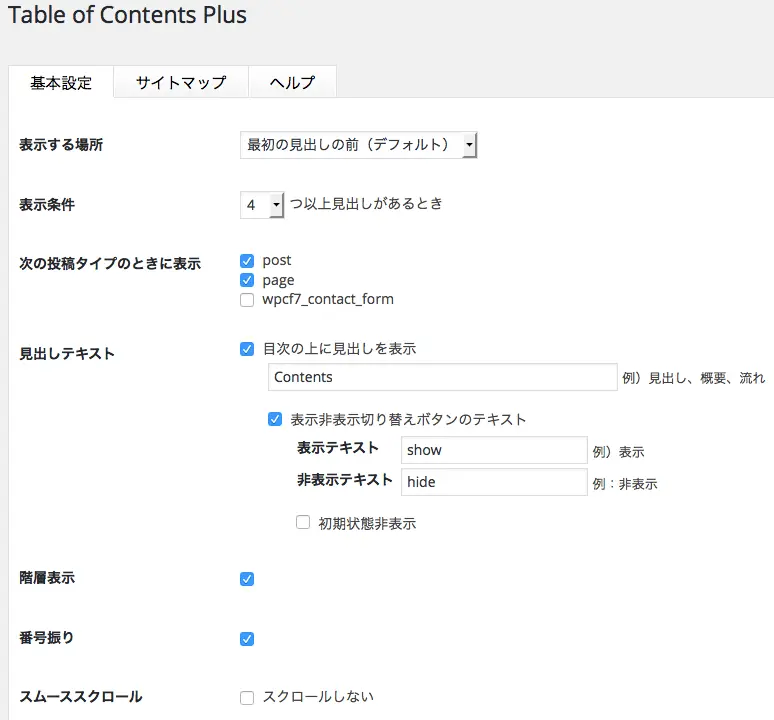
設定画面は、日本語化されているので分かりやすくて簡単。
表示する場所、目次を作成する条件、見出しのテキストやデザインなどが設定可能です。
とりあえず適当に設定して、確認すると良いでしょう。
デザインは表示はその後に詰めていけば問題ありません。
表示デザインの変更
表示デザインは、デフォに用意されているデザインテンプレートから選択します。

カスタムを選べば、ボーダーや背景カラーを任意に設定できます。
ボーダーのスタイルなど細かいデザインを弄るには、プラグインフォルダにあるscreen.css / screen.min.cssの内容を直接弄ると良いでしょう。

screen.cssの内容
#toc_container ul,#toc_container li {
	margin:0;
	padding:0;
}

#toc_container.no_bullets ul,
#toc_container.no_bullets li,
#toc_container.no_bullets ul li,
.toc_widget_list.no_bullets,
.toc_widget_list.no_bullets li {
	background:none;
	list-style-type:none;
	list-style:none;
}

#toc_container.have_bullets li {
	padding-left:12px;
}

#toc_container ul ul {
	margin-left:1.5em;
}

#toc_container {
	background:#f9f9f9;
	border:1px solid #aaa;
	padding:10px;
	margin-bottom:1em;
	width:auto;
	display:table;
	font-size:95%;
}

#toc_container.toc_light_blue {
	background:#edf6ff;
}

#toc_container.toc_white {
	background:#fff;
}

#toc_container.toc_black {
	background:#000;
}

#toc_container.toc_transparent {
	background:none transparent;
}

#toc_container p.toc_title {
	text-align:center;
	font-weight:700;
	margin:0;
	padding:0;
}

#toc_container.toc_black p.toc_title {
	color:#aaa;
}

#toc_container span.toc_toggle {
	font-weight:400;
	font-size:90%;
}

#toc_container p.toc_title + ul.toc_list {
	margin-top:1em;
}

.toc_wrap_left {
	float:left;
	margin-right:10px;
}

.toc_wrap_right {
	float:right;
	margin-left:10px;
}

#toc_container a {
	text-decoration:none;
	text-shadow:none;
}

#toc_container a:hover {
	text-decoration:underline;
}

.toc_sitemap_posts_letter {
	font-size:1.5em;
	font-style:italic;
}